CSS Lab
lab
You might have noticed that the web page you created last week was very plain. That’s because we have only been using half of the modern web design toolkit. The missing half was Cascading Style Sheets, also known as CSS. CSS is used to add color, formating, alignment and other styling information to web pages.
Separating Style from Content
In web design, there is a very clear separation of roles:
- HTML is for formating and organizing content
- CSS is for adding color, style and flair to the organized content
Therefore every single web-page usually consists of two files: a html document, and a style sheet that defines how it should look.
This is actually very powerful idea, because it allows a single content file to have multiple “styles” associated with it. The look and feel of a website can be completely redesigned without ever touching the content.
In this lab we will be creating a Cascading Style Sheet for our HTML web page.
Creating a Style Sheet
Before you start, please make sure your Windows computer is configured to display file extensions. To do so, open Windows explorer and click on the View tab and make sure the “File name extensions” box is checked:

Next, make a copy of the folder you created in the last lab and name it html2.
Open your HTML file, and add the following HTML tag into the <head> section:
<link rel="stylesheet" href="style.css"/>The <link> tag is used to “link up” the style sheet document to your HTML file. Without it, the web browser won’t know which style sheet, if any to apply to the page. The href attribute above specifies the exact name of the style sheet document.
Your <head> section should look something like this when you are done:
<head>
    <title>My Webpage</title>
    <link rel="stylesheet" href="style.css"/>
</head>
Next, close your HTML document. Right click anywhere within the empty folder, expand the New menu, then choose “Text Document” option (remember, web pages are all text documents).
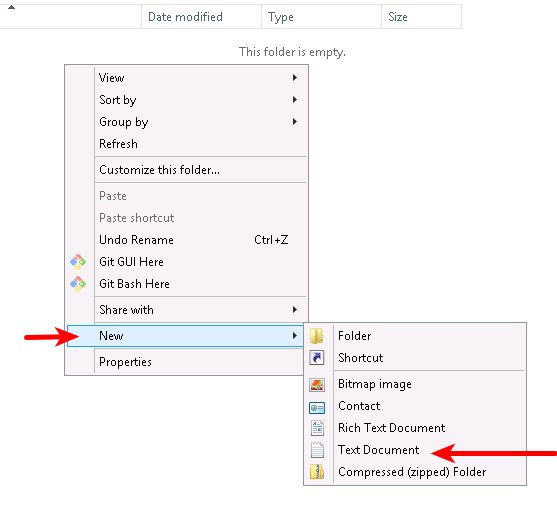
You will be asked to rename your new text document. Change it’s name to style.css and hit enter. You will see a prompt asking you if you are sure you want to change the file extension. Click “Yes”.
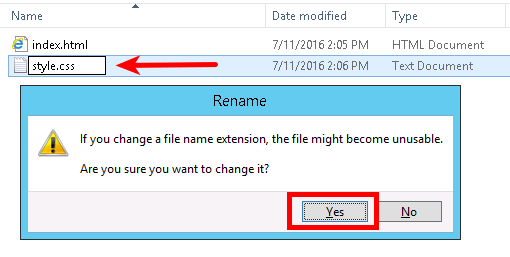
If for some reason you miss-clicked and missed the opportunity to re-name your document as it was created, simply right-click on it, and choose “Rename”.
Please make sure the name you given to your style sheet document matches the value of the href attribute of the <link> tag inside your HTML document.
Now you have a blank CSS document. Practice opening it in your text editor.
CSS Syntax
Cascading Style Sheets have their own syntax which is different from HTML.
A style sheet is composed of rules. Each rule applies a style or formating to some part of your web page.
A CSS rule is composed of a selector, followed by one or more declarations enclosed in curly brackets.
The declarations are delimited with semi-colons, and consist of a property name followed by a colon and a value.

The selector will usually be HTML tag name.
For example if you wanted to change the color of all <h1> headings to red, you could create a HTML rule like this:
h1 { color: red; }The CSS rules “cascade” over, and affect all the child-tags of the ones you are currently styling. Therefore if you wanted to change the default color of regular text paragraphs to blue you would use:
p { color: blue; }This rule would “cascade” over, and all the <em> or <strong> tags enclosed within paragraphs would also become blue. Heading tags such as <h1> or bullet point lists, which are not typically enclosed within <p> tags would remain unchanged.
If you want to apply formating to all tags in the document, you should apply it to the top-most content tag which is <body>:
p { color: blue; }All the other tags contained inside <body> “inherit” this rule and display their contents as blue. That said, another rule defined after this one will override this color setting. That’s because the CSS rules are evaluated and applied in the order in which they appear in the file.
This allows you, for example to say something like: I want all text on the page to be blue, except level 1 headings, which should be red.
body { color: blue; }
h1 { color: red; }
Consider the following HTML snippet with two sections, some headings and basic paragraph text:
<section>
    <h2>My Hobbies</h2>
    <p>List of you hobbies.</p>
</section>

<section>
    <h2>My Work</h2>
    <p>Stuff about where you work.</p>
</section>
By default it would yield black text on white background:
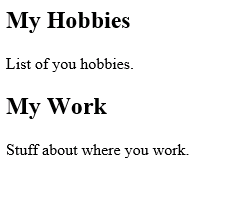
Let’s say we created a style sheet with the following rules:
body    { background-color: black; color: white; }
section { background-color: gray; }
h2      { color: red; }
How would this change the appearance of the text? Let’s read the rules in order in which they are defined:
- First rule will make the background of the document black, and all the text on the page white
- Second rule will make the background of
<section>tags to be gray, overriding the first rule - The third rule will override the text color rule and make all level 1 headings red, regardless where they are in the document
The result will appear like this in the browser:
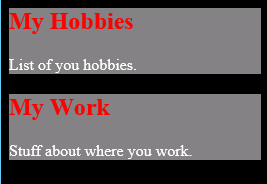
We have drastically altered the look and feel of the website without actually touching the content. Compare that to editing Word documents where content and formatting are typically intertwined and hard to separate.
Common CSS Properties
Here are some commonly used CSS properties you can use to format your documents:
color |
Change text color. |
text-align |
Align text left, center or right. |
text-decoration |
Add underline, overline or line-trhough decoration. |
font-family |
Specify specific font-face (eg. Arial) or font type (eg. Sans-Serif). |
font-size |
Specify size of font in px (eg 12px), % or using keyword like small, medum or large. |
font-style |
Choose normal, italic or oblique. |
font-variant |
Make the font to be small-caps or normal. |
font-weight |
Make the font bold, bolder, lighter or normal. |
background-color |
Change the color of background. |
border |
Draw a border around the element. |
width |
Width of the element in px or % of the screen. |
max-width |
Maximum width to which this element can expand when you resize the browser window. |
min-width |
Minimum width to which this element can shrink when you resize the browser window. |
height |
Height of the element in px or % of the screen. |
max-height |
Maximum height to which this element can expand when you resize the browser window. |
min-height |
Minimum height to which this element can shrink when you resize the browser window. |
The color and background-color properties accept names of basic colors such as black, red, white, blue and etc.. They also accept HTML Color Codes which are 6 digit numbers preceded by a number sign. You can find a big list of HTML Color Codes here.
As an example, you could create a CSS rule like this:
body { color: #808000; background-color: #FFFFF0; }
h1 { color: red; text-decoration: overline; font-family: Georgia; }
The border property actually takes more than one value. Typically you specify it with at least thee. The first value specifies the thickness, the second specifies type (solid, dashed, etc..) and the third one describes color. For example:
section { border: 1px solid green; }Using id and class attributes
You don’t always have to apply CSS rule to all of the tags of the same type in the document. For example if you only want to apply style to <h1> tags inside the <header> section you can write the rule like this:
header>h1 { color: blue; }This tells the browser to only apply this rule to <h1> tags which are children of the <header> tag.
Sometimes you may want to be even more specific and apply formating to one and only specific <h1> tag and leave all the other ones alone. In such case you may add an id attribute to the <h1> tag like this:
<h1 id="special">Special Heading</h1>The id attribute can be placed on any tag (not just <h1>) and it acts as a unique identifier. It allows you to create a rule that only affects the tag with that specific id by prefacing it with the # sign like this:
#special { color: blue; }Sometimes you may want to apply formating to a group of tags. In that case you can give all of them the same class attribute:
<ul>
    <li class="important">Important text</li>
    <li>Not important</li>
    <li class="important">Also important</li>
</ul>

<p class="important">This also</p>
You can create a rule that will change the color of the first and the third <li> and the <p> tag below the list by prefacing the selector with a dot like this:
.important { color: red; }The Box Model
When styling HTML tags, it is best to think of each as a box with an invisible border that is structured as so:
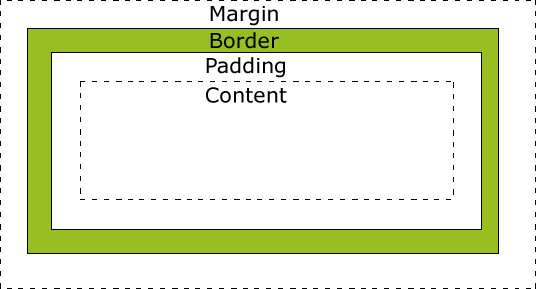
This box has following properties that can be manipulated:
margin |
The space outside of the border. |
border |
A border that surrounds the content and can have color and thickness or be transparent. |
padding |
The space between the border and the actual content. |
You can, for example, create a rule like this:
article { margin: 10px; padding: 20px; border: 1px solid blue; }This will give each article a 10 pixel margin on all sides, a thin blue border and a 20 pixels of padding inside that border. If you don’t want to apply these properties to all sides of the box you can create separate declarations for each one:
article { margin-right: 10px; padding-bottom: 5px; }You can learn more about CSS by reading the W3C Tutorials.
The Assignment
Your assignment is to add CSS to the web page you created in the previous lab.
- Make a copy of the previous lab folder, and call it
html2 - Create and link a style sheet and name it
style.css(see here) - Create at least 4 CSS rules within your style sheet
To receive full credit, all the rules must visibly change the color or formating of your document.
For additional credit do the following:
- Use css rules to style specific tags based on
idandclassattributes (see here). (10pt)
For submitting, please refer to the Submission Instructions.
Please make sure you do not overwrite your html1 folder when submitting this assignment.