HTML Lab
lab
This lab aims to teach you basic of web design using Hypertext Markup Language (HTML). The next lab will show you how to use Cascading Style Sheets (CSS). These two technologies are the fundamental underlying building blocks of the world wide web, and are used to build every single site you visit during your day.
What is a Markup Language
As the name suggests, HTML is a “markup language”, but what does that even mean? To put it plainly, markup language is a system for annotating documents in a way that is indistinguishable from text. The idea evolved from the traditional method of “marking up” paper manuscripts with formatting instructions intended for the operator of a printing press:
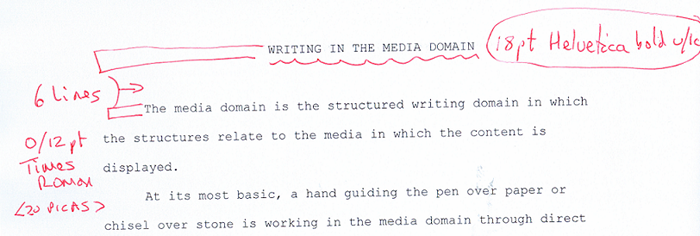
HTML replaces the “penciled in” instructions with a system of “tags” that can be read by a computer, and used to properly format the text when it is printed or displayed on the screen. For example, this is how one would make bullet points in HTML:
<ul>
    <li>One</li>
    <li>Two</li>
    <li>Three</li>
</ul>
Working with markup is a bit different from working in a
Editing HTML Documents
To edit a HTML document you will need a text editor. Any editor will do and in the lab we will be using Notepad or something equivalent.
If you are working on this assignment at home, Notepad will do just fine. If you happen to be a Mac user however, please don’t use TextEdit. I highly recommend that you download Sublime Edit and use that instead. It is not free software, however you can use the evaluation version until the end of the semester. If you should choose to continue using the editor after the course is over, you should consider purchasing it.
Some text editors will have nice features like syntax highlighting (which will make formatting tags appear a different color than basic text) or a kind of “spell-check” functionality which will highlight syntax errors in your markup.
A web page opened in a text editor will look something like this:

The colors of the formatting tags may be different depending on the editor. Notepad has no syntax highlighting and so it will display no color.
What is a Web Page?
A web page is a text document created in Notepad (or Sublime Edit) and saved with a .html file extension.
When you double click on a HTML file will open in a web browser (this may be Internet Explorer, Mozilla Firefox, Google Chrome or Safari depending on your settings). This is because the .html file extension is associated with a web browser application (we talked about file extensions during the File Systems lecture so this should be a familiar concept by now).
To edit the contents of the HTML file, you will need to open it in a text editor. To do this:
- Open your text editor (Notepad, Sublime Edit, etc..)
- Browse to the File menu and choose Open
- Find your file and double click on it
When working with HTML documents, I suggest that you open it in a text editor and in a web browser, then put the windows side by side on your screen. Whenever you make changes in the text editor, save the document, and then refresh the browser page to see the changes reflected.
Starting a HTML Document
To create your first HTML document, first make sure your Windows computer is configured to display file extensions. To do so, open Windows explorer and click on the View tab and make sure the “File name extensions” box is checked:

Next, create a folder named html1 on your desktop. Open it, right click anywhere within the empty folder, expand the New menu, then choose “Text Document” option (remember, web pages are all text documents).
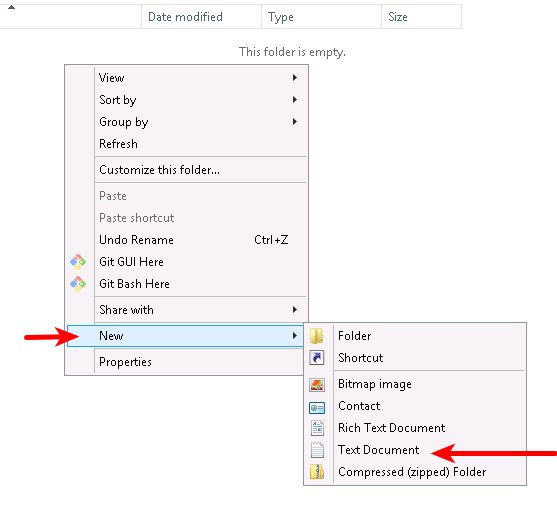
You will be asked to rename your new text document. Change it’s name to index.html and hit enter. You will see a prompt asking you if you are sure you want to change the file extension. Click “Yes”.
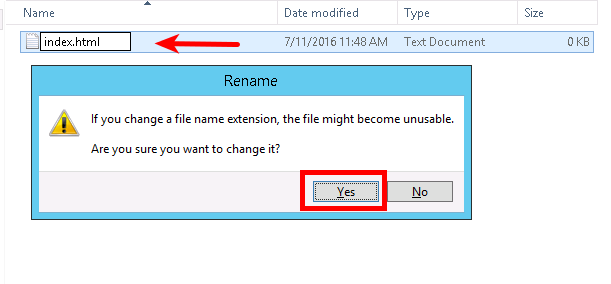
If for some reason you miss-clicked and missed the opportunity to re-name your document as it was created, simply right-click on it, and choose “Rename”.
Now you have a blank HTML document. Practice opening it in your text editor and in a web browser. See if you can put the windows side by side. Type something into the blank document in your text editor, save it, then refresh the web browser. You should see your text appear on the page.
HTML Tags
HTML documents use the concept of a tag. A HTML tag is usually a word enclosed in the angular brackets < >. Tags usually come in pairs, so we can distinguish between an opening tag (eg. <h1>) and a closing tag (eg. </h1>). The opening and closing tags enclose the text to be formated. Here is an example:
<h1>Hello World!</h1>In this example we are using <h1> tag which stands for Heading 1 or first level (large) heading. This markup will make the words “Hello World!” as a large chapter heading.
Most tags (with few notable exceptions) follow this pattern of opening and closing tags.
HTML tags may have what we call attributes. Attributes are a list of key-value pairs embedded inside an opening tag like this:
<a href="http://example.com" >This is a tag with attributes</a>An attribute consists of a key, which is a single word followed by an equal sign, and a value enclosed in quotation marks. A single tag may have any number of attributes, or none whatsoever. Attributes are only included on the opening tag, and always after the tag name. Multiple attributes can be listed in any order as long as the key/value pairs are kept together, and each attribute is separated by at least one space from the previous one.
Every tag may be given an id attribute, which can be set to any value. That value, can then be used to refer to that specific tag elsewhere in the page.
Some tags do not have a “closing” tag. For example the <br> tag used to create a line break is always used on its own.
The HTML Boilerplate
HTML documents must conform to standard defined by World Wide Web Consortium (or W3C). This means you can’t just start typing random HTML tags in a document, but instead have to follow a certain pattern:
- Every web page must start with document type declaration. For our purposes this simply means that the first line of the document will always be:
<!DOCTYPE html>. - The remainder of the document needs to be enclosed in
<html>and</html>tags. - The document must contain
<head>and<title>tags at the beginning, before the<body>tag - The content of the page must be placed fully within
<body>and</body>tags
Here is an example of a very basic webpage in it’s entirety:
<!DOCTYPE html>
<html>
    <head>
        <title>My Page Title</title>
    </head>

    <body>
        <p>Hello World</p>
    </body>
</html>
Copy and paste the above into your blank document, save it, then refresh the web browser. Note the position of the “Hello World” and “My Page Title” text on the page. I highlighted them with red arrows:
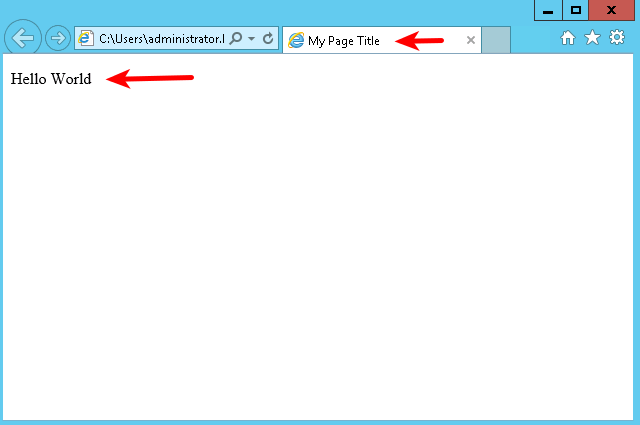
As you can see, only the text inside the <body> tag is displayed as web page content. The rest of the text above is just markup. Here is what the individual tags actually mean:
<!DOCTYPE> |
This tag must always be on the first line of the document. This tells the web browser we are using the modern HTML5 standard. If you skip this tag, the browser will have to guess which HTML version you are using, and it may guess wrong, resulting in odd side effects. |
<html> |
This tag wraps the entire document and delimits where actual content starts and ends. You should never have more than one set of these tags, and there should never be anything below the closing one. The </html> should mark the absolute end of your document. If you put anything below it, it won’t be displayed properly. |
<head> |
This tag encloses so called “metadata” - basic information about the content of the document. In this example it only contains <title> tag. It may seem superfluous and useless, but you have to have it. |
<title> |
Tells the browser what title to put on the tab pane. |
<body> |
This tag encloses the actual content of the web page which is to be displayed on the screen. The </body> tag should be the second to last line of your document. |
White Space
When displaying your web page content, browsers will ignore any and all tabs, line breaks, or repeated spaces in your document. The only exception are the single spaces in between words. The colloquial term we use to refer to things like spaces, tabs and line breaks is white space.
In HTML you cannot use white space for alignment or formatting or paragraphs. Line breaks and paragraph breaks must be explicitly entered using HTML tags.
Here is an example of how to format paragraphs and headings properly:
<h1>This is a heading</h1>
<p>This is a paragraph. It may contain multiple sentences.</p>
<p>This is a second paragraph.</p>
<h2>This is also a heading</h2>
<p>This is a third paragraph.<br/> It has a line break in the middle.</p>
When rendered in the web browser the above code should look like this:
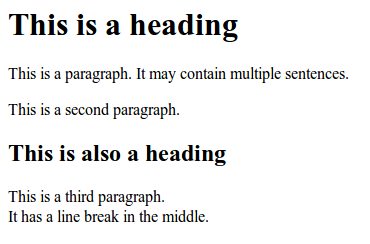
Note how there is a little bit of vertical space between the paragraphs and a bit more space above and below headings. When you use the <p> or heading tags, the browser will add this padding to keep things separated. If you wish to avoid this, you can use the <br/> tag. It breaks the text to the next line immediately without any extra spacing.
<h1> |
Creates a large “heading” with paragraph break below. There’s also <h2>, <h3> and etc, all the way to <h6> |
<p> |
Creates paragraphs with a little bit of spacing above and below. |
<br> |
Creates a line break without any vertical spacing. |
<hr> |
Horizontal rule - draws a horizontal line across the page with spacing above and below. |
As a rule of thumb, you should use the <br> tag sparingly and rely on <p> tags to define paragraphs.
Basic Formating
HTML offers several tags that can be used to add simple formatting to your text. You can use it emphasize certain words, or make certain things stand out on the page.
<em> |
Emphasis. Used to make words or sentences stand out. Contents of the tag will be italicized. |
<strong> |
Used for strong emphasis. It tends to make the enclosed text boldface. |
<small> |
Used to make contents smaller than the default text. |
<blockquote> |
Used to display quotes as an indented block. Makes contents slightly indented and emphasized. |
<q> |
Quote. Used for inline quotes. Makes contents italicized or oblique. |
<pre> |
Pre-formated. Displays text in ugly monospace font and preserves white space formatting. |
<address> |
Used for displaying street addresses. The contents may be italicized. |
<time> |
Can be used to enclose dates or times. |
<code> |
Used for enclosing computer code snippets. Typically makes the text monospace. |
All of these tags must have accompanying closing tags, and affect only what is inside them.
You can combine and “nest” HTML tags together:
<p>This is normal, <em>emphasized <strong>and strong</strong></em></p>Lists
You can use HTML to create bullet point, or numbered lists. Here is an example:
<ul>
    <li>A list item</li>
    <li>Another list item</li>
</ul>
The tags available for making lists are as follows:
<ul> |
Starts an unordered (or bullet point) list |
<ol> |
Starts an ordered (or enumerated) list |
<li> |
Stands for “list item” |
Links
Links are what binds the World Wide Web together. They are by far one of the most important components of each web page. In HTML you create links using the anchor tag <a>.
This tag is somewhat unique in that on its own it does absolutely nothing. However if you use it with the href attribute (which stands for HTTP Reference) it turns the enclosed text into clickable link that will send the reader to the web page specified as the value of that attribute.
<a href="http://montclair.edu">Montclair State University</a>In the above example, the words Montclair State University will become a clickable link which will take you to the MSU home page. The href attribute is mandatory and without it the link won’t work. Note that you also cannot leave the contents of the tag blank, or else there will be nothing for the user to click on.
You can also link to a specific heading within the same document. To do so, give one of your headings an id attribute, and then use the # character, followed by the value of that id attribute instead of a web address:
<h1 id="top">Welcome!</h1>

    <a href="#top">Top of the Page</a>
For example, click here to go to the bottom of this page.
Images
Embedding images in your website is accomplished using the <img> tag. Much like <br> it is a stand-alone tag which does not need to be closed. Instead it requires two mandatory attributes: src (which stands for “source” as in the source of the image) and alt (which stands for “alternate text”).
The former lets the web browser know where to find the image, and the second lets it know what to display on the screen if the image is missing or cannot be used (for example if you are browsing the web using a screen reader).
<img src="http://example.com/image.jpg" alt="My Image">Adding the alt tag may seem superfluous but you should keep in mind that vision impaired users of the web cannot see images, and therefore they are absolutely reliant on these tags in order to make sense of web pages.
Also note that the src attribute must point to an actual image file. This means it should always end in a file extension associated with images such as (but not limited to) .jpg, .png or .gif. If a link you are using does not end in one of these extensions, the image will probably not display properly on your web pages.
Note that embedding image this way (ie. by using a full web address) is known as hot-linking and is frowned upon. As a rule of thumb, you should never hot-link to images which are hosted on websites you do not own. If you do this, you are putting yourself at risk, because the author of the website may delete or swap the image with a different one at any time.
To ensure your website is not suddenly full of broken images (or worse - defaced with obscene imagery) you should save the image you like to the same folder as your page. If you do so, you can use a simplified form of the tag:
<img src="image.jpg" alt="My Image"/>You just must make sure you upload image.jpg to the server along with your HTML files when you are ready to put your page up on the web.
Tables
Tables work much like lists in that they require a nested structure. HTML defines a number of tags just to facilitate creation of tables:
<table> |
Starts a new table |
<caption> |
Used to add table caption. |
<thead> |
Starts table heading (where you define headings) |
<tbody> |
Starts table body |
<tr> |
Begins a new table row |
<th> |
Creates a table heading cell |
<td> |
Creates ordinary “table data” cell |
Here is an example of how these come together to create a small table:
<table border="1">
    <caption>Price List</caption>
    <thead>
        <tr>
            <th>Product</th>    <th>Price</th>
        </tr>
    </thead>
    <tbody>
        <tr>
            <td>Pencil</td>     <td>$2</td>
        </tr>
    </tbody>
</table>
The above will look like this:

Note how this table has two rows (each enclosed by a <tr> tag) and four cells (two in each row, enclosed by <th> and <td> tags respectively).
In HTML there is not such thing as columns. You define rows, and then you add individual cells in said rows. It is possible to have rows with miss-matched numbers of cells in which case the missing cells will simply be rendered blank.
The <caption> tag is optional, but if used it must immediately follow the <table> tag.
As you can see in the example above, you can use the border attribute to specify that a table should have borders. By default, tables will be borderless.
Containers
HTML5 uses special structural tags that are supposed to act as containers that help to compartmentalize your content. They don’t provide any formating, but can be used to group the content on the page into sections.
<article> |
Encloses a single “article” or blog post. |
<section> |
Encloses an arbitrary portion of text: eg. a single topic. |
For example in a personal web page you may want to create separate sections for different topics:
<section>
    <h2>My Hobbies</h2>
    <p>List of you hobbies.</p>
</section>

<section>
    <h2>My Work</h2>
    <p>Stuff about where you work.</p>
</section>
There are also two general purpose container tags that can be applied to enclose arbitrary amounts of text:
<span> |
Used to enclose one or more words. Used for applying color and formatting with CSS. |
<div> |
Used to create a “division” which is not necessarily a section or an article. |
The <span> and <div> containers have no specific meaning and you should only use them if no other tag would make sense.
The Assignment
Your assignment is to create a simple HTML page. The topic matter is up to you. Your page must include:
- Valid HTML5 including the correct
DOCTYPEtag - Correctly formatted
<head>tag including a<title> - At least 3
<section>tags inside of the<body> - Each section should contain a heading (eg
<h2>) and one or more paragraphs (<p>). - At least one image. All
<img>tags must containaltattribute. - At least one bullet point or enumerated list.
For additional credit, please try the following:
- Use a HTML table. (10pt)
For submitting, please refer to the Submission Instructions.
Name your folder html1 and your web page index.html.